- You must download appropriate ubuntu kernel release from
http://kernel.ubuntu.com/~kernel-ppa/mainline/ (in this case I am download 2.6.32 kernel version for update)
- Download this 3 file types (it will depend on your processor architecture - my one is Intel 32bit - then i am downloaded i386 file types)
(your downloaded file must contain this names as file name)
i. linux-headers-??????????_all.deb
ii. linux-headers-??????????_i386.deb
iii. linux-image-????????????_i386.deb
Ex: (my downloaded files in order to above file naming criteria)
linux-headers-2.6.32-020632_2.6.32-020632_all.deb
linux-headers-2.6.32-020632-generic_2.6.32-020632_i386.deb
linux-image-2.6.32-020632-generic_2.6.32-020632_i386.deb
- Open Ubuntu terminal window and install above files one by one.
[** YOU MUST INSTALL THESE FILES AS GIVEN ORDERS BELOW**]
- These files are store relevant folder (I am store on desktop).then open terminal from that folder
type in terminal these commands in highlighted with blue.
- FIRST you have root privilege to install programs
sudo -i (for install program as root: after it will ask password and type it)
if you log as root then console show like this:
root@ubuntu:/home/username/Desktop/
STEP 1 .Then install our first file like this:
dpkg -i linux-headers-2.6.32-020632_2.6.32-020632_all.deb
STEP 2 .There after install our second file like this:
dpkg -i linux-headers-2.6.32-020632-generic_2.6.32-020632_i386.deb
STEP 3 .Finally install our third file using this command
dpkg -i linux-image-2.6.32-020632-generic_2.6.32-020632_i386.deb
- Reboot the machine.
- Type uname -a and find updated kernel versions .

Find kernel version
Showing posts with label Ubuntu. Show all posts
Showing posts with label Ubuntu. Show all posts
Sunday, April 21, 2013
How To Update Linux Kernel In Ubuntu - Manually

Wednesday, February 20, 2013
Install MySQL In Ubuntu On VMware And Connect Through The Host Pc (windows or any host pc)
This article explain how to install MySql 5.5 with Ubuntu 12.04 on VMware (VMware Workstation 8.0.1) and connect through the virtual pc to access the MySql databases in Host pc (Windows or what ever os on host pc).
1.Install MYSQL On Ubuntu 12.04
1.Install MYSQL On Ubuntu 12.04
sudo apt-get install mysql-server
(make sure you are log in as root user,fast internet connection help to download package's correctly.if network connection slow,then download packages may be corrupted!)
2.Install MYSQL Workbench
sudo apt-get install mysql-workbench
sudo service mysql restart (this 'sudo' command not recommend if you are log in as root user.)
3.Host pc network connection parameters:
Disable other network connection as below.

figure 1.0
1.Goto VMware network adapter properties
2.Checked VMware Bridge Protocol.
3.Select appropriate ip range. VMware set default IP range
something like 192.168.###.###
eg: 192.168.137.1 <- and="" be="" equal="" font="" guest="" ip="" must="" nbsp="" ost="" range="">
4.Guest(VMware - Ubuntu) pc network connection parameters:
1.Goto Network settings (top right corner)
2.Goto Edit Connections...
3.Select Wired Connection1 and click edit button
4.Select IPv4 Settings and Set Method as Automatic (DHCP)
5.Don't set DHCP client id or routes
6.Click available to all users ,then save.
Check whether ip address in a same range(first 9 digits must be same).(host ip range 192.168.137.###) guest must be 192.168.137.###)
To check above connection information's click network connection icon on top right corner of desktop(ubuntu) and select connection information as below.
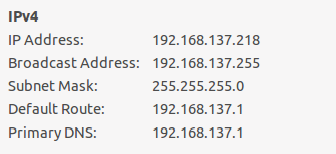
figure 2.0
5.Create MySQL user (type these command in MYSQL command terminal)
open terminal and type mysql -u root -p
then type your root mysql password
then type
create user 'username'@'192.168.137.218' identified by 'your-new-password'
eg:
create user 'abc'@'192.168.137.218' identified by 'abc123'
create user 'abc'@'%' identified by 'abc123';
5.1 Replace username with your new user name to given and insert new password in to 'your-new-password'
5.2 Make sure your ip address is should be ubuntu-pc's IP address
eg: 192.168.137.218 in figure 2.0
5.3 Then grant privileges to above user
grant all privileges on *.* to 'abc'@'%' with grant option;
5.4 Then flush the privileges
flush privileges;
5.5 Restart mysql services
type this
service mysql restart;
5.6 Then goto host pc (your windows pc)
used any MySQL GUI or command line program and set the particular parameters.
eg:
mysql user: abc
host ip : 192.168.137.218 (ubuntu-pc ip address)
password : abc123
Thats all......Have FuN.....
------------ SOME USEFULLY COMMANDS ON UBUNTU -----------
(shell prompt type following command)
To login as root user in mysql
mysql -u root -p
To login with host name
mysql -u root -h myserver-sever.com -p
To Login with host ip address
mysql -u root -h 192.168.137.218 -p
To restart mysql services:
service mysql restart
To stop mysql services:
service mysql stop;
To start mysql service
service mysql start
create user ('%' mean any host )
CREATE USER 'freevbs'@'%' IDENTIFIED BY 'passpass';
Granted all the privileges to user freevbs
grant all privileges on *.* to 'freevbs'@'%' with grant option;
To flush privileges (alredy login in mysql )
flush privileges;
try login with freevbs
mysql -u freevbs -p;
onece you login you can check users
SELECT USER(),CURRENT_USER();
More MySQL Commands please visit below url:
http://manpages.ubuntu.com/manpages/lucid/man1/mysql.1.html
------------------------------------------------------
Vmware ubuntu 12.04 - windows 7 networking
Virtual machine settings :
-------------------------
Network adapter - Host Only
IPv4 Settings - Method Automatic DHCP
IPv6 Settings - Method Automatic
Host-PC
---------
Select your network adapter
eg: Celcome3G BroadBand
Right click - > properties ->goto Sharing-> select
Allow to other network users to connect through this computer's internet connection.
Then select vmware network adapter VMNet1.
Then Press OK.
VMWare Tool Installation for Ubuntu
#Mount the CD drom
sudo mkdir /mnt/cdrom

sudo mount /dev/cdrom /mnt/cdrom
#Run this command to find the exact name of the VMware Tools bundle; the file name varies depending on your version of Fusion:
ls /mnt/cdrom
#Extract contents of cdrom to tmp directory
tar -zxvf /mnt/cdrom/VMwareTools-.tar.gz -C /tmp/
Note: is the version discovered in the previous step which at the time of writing was VMwareTools-8.3.7-341836.tar.gz
#now move into the vmware tools directory in tmp directory.
cd /tmp/vmware-tools-distrib/
#Run the installer  with the -d switch to accept defaults.
sudo ./vmware-install.pl -d
Enabling the root account in ubuntu
sudo -i
To enable the Root account (i.e. set a password) use:sudo passwd root
Tuesday, October 11, 2011
How to install a software in Ubuntu
There are many different kinds of Linux package files. Most of these are associated with the package managers of specific Linux distributions. Examples are Debian Package files (
This section deals with installing these single files.
Installing/uninstalling
These files are Debian packages. The package files associated with Ubuntu have the
To install a
You can use your package manager to uninstall a
Converting
Another type of package is the Red Hat Package Manager (RPM) file. These have the
To convert an RPM into a
Files with the
If there is no native Ubuntu package available in any of the Ubuntu repositories, you can use the command line to install or uninstall the tarball file.
The first step will be to uncompress and extract the tarball. If it is a .tgz or a .tar.gz, in a Terminal enter:
Then it will be necessary to follow the instructions that come with the package. These are generally located in the extracted tarball in a file called
Tarballs often contain the source code of the program, and need to be compiled in order to be used.
Install
Sometimes you may need to install software (most often a game) which has been packaged as a .run file. These files contain the software and a small program to install the software.
Follow the procedure below to install software packaged in a
.deb files), RPM Package Manager files (.rpm files), Tarballs (.tar files) and .run files. This section deals with installing these single files.
![[Warning]](https://help.ubuntu.com/8.04/images/admon/warning.png) | |
| It is not guaranteed that these files will be compatible with your system and you will not receive security updates if you install these files. For these reasons, if you wish to install a program, always use a native Ubuntu package of the application available through a package manager, if there is one available. |
Installing/uninstalling .deb files
.deb suffix because of Ubuntu's close relations with the Debian GNU/Linux distribution. You will need administrative privileges to install a .deb file. See Administrative Tasks for more details. To install a
.deb file, double-click on it. If you prefer using the Terminal, enter: sudo dpkg -i package_file.debYou can use your package manager to uninstall a
.deb file once it has been installed. Alternatively, enter the following in a Terminal: sudo dpkg -r package_nameConverting .rpm files to .deb files
.rpm suffix. It is not recommended to install these on an Ubuntu system. In almost all cases, a native Ubuntu .deb package is available. However, if absolutely necessary, an .rpm file can be converted to a .deb package using the alien application. The resulting .deb file can be installed as described above. To convert an RPM into a
.deb:- Install the alien package.
- In a Terminal, enter:
sudo alien
package_file.rpm
Installing tarballs
.tar, .tgz, .tar.gz or .tar.bz2 suffix are package files known as tarballs, and are widely used in Linux and Unix to package software. Tarballs can also be used to archive and compress other files.If there is no native Ubuntu package available in any of the Ubuntu repositories, you can use the command line to install or uninstall the tarball file.
The first step will be to uncompress and extract the tarball. If it is a .tgz or a .tar.gz, in a Terminal enter:
tar xfvz tarball_nameThen it will be necessary to follow the instructions that come with the package. These are generally located in the extracted tarball in a file called
README or INSTALL. Tarballs often contain the source code of the program, and need to be compiled in order to be used.
![[Note]](https://help.ubuntu.com/8.04/images/admon/note.png) | |
| Compiling programs requires some packages that are not installed by default. You can install most of these all at once by installing the build-essential package. |
Install .run packages
Follow the procedure below to install software packaged in a
.run file:- Find the
.runfile in the File Browser - Right-click the file and select Properties
- Under the Permissions tab, make sure that Allow executing file as program is checked and press
- Double-click the
.runfile and press to run the installer - A Terminal window will open. Follow any instructions on-screen to install the program
| | |
| Once you have started the installer, it may take a while to display an installation screen. This is normally due to the installer extracting all of the files from the .run file ready for use. |
Subscribe to:
Posts (Atom)